Here we will provide you with a detailed info on How to Install a Water Softener. Also check out the necessary information about the handling of the softener system.
Hard water has been causing trouble to the home appliances for a long time now. Water with high levels of calcium and magnesium results in hard water. To reduce the hardness in the water, people decide to buy a water softener which will help you solving the issue.
There was a time when people bought considered this product as a luxury. But now with passing time, it has become more of a necessity than a luxury. We will begin with the introduction of the Water Softener technology and check on the installation procedure.
What is a Water Softener
The process of softening is defined as the removal of the calcium, and magnesium ions from the water. These are the hardness causing elements present in the water. The softened water can mix up well with the soap water, creating the right kind of foam. Thus the life of the water-related equipment is maintained with the softener. You must check out various positive Water Softener Reviews to find a good system which fits all your needs.
Mainly the hardness causing element in the water include bicarbonates, chlorides, and other sulfates. These can cause limescale buildup within the pipes, and also damage many household appliances like washing machine, water-taps and much more.
Recent updates: Water Conditioner vs Water Softener | Know the Difference
To remove the hardness, water softener system must be preferred. And most of them include ion-exchange resin method. Here, the calcium and magnesium ions are replaced with the sodium ions. Thus the resulting water will be salty in nature.
For those people who are not allowed to consume salt in their meals, should refrain from using the regular softener system. Instead, they can prefer the Best Salt-Free Water Softener Systems, which performs the same task as other water softener system.
Check the Fleck Water Softener working on this – Fleck Manual
If you have got hard water at your place, then it is recommended to treat the water as soon as possible. This is because hard water accompanies other water issues like the taste and the smell of the water is also altered significantly.
How to Install a Water Softener
The level of difficulty varies not only from one machine to another. But there are many other factors which affect the installation of the water softener. Some of them include the type of the pipes used in your area, the location at which you wish to install the unit, etc.
The types of water softener found for the softening purpose are salt-free, salt based, magnetic, Reverse Osmosis, and also a whole-house unit. The magnetic ones are the easiest for installing, while the hardest is the whole house unit. And the whole house unit requires the need of an expert installation.
Here, we will check out the steps for installing water softener unit in a Do-It-Yourself kind of manner. But before this, you need to be equipped with some instruments for the installation.
These machinery tools required for installation of a water softener are Pipe cutters, two union fittings, Teflon tape, two compression settings, gate valves, torch and solder, tubing or copper pipe, tape measure, PVC solvent or flux, flexible tubing, a pipe wrench.
Now we will list out the steps for the installation of a Water Softener system:
| Steps of How to Install a Water Softener | |
|---|---|
| 1 | Turn off the water supply from the main line. You need to drain out the pipes at your home by just opening the lowest valve, to let the water be removed entirely. |
| 2 | Turn off the water heater systems, and also the power which leads the connection. |
| 3 | Then you have to decide the place where you want the water softener to be set. The connection should be made in such a way that the softener unit is positioned before the line feeds to the water heater. |
| 4 | Then you need to make a cut on the main line, using the pipe cutter. Place the cutter on the tube, then rotate it all the way around it, till you cut the pipe. If you find any amount of water getting during this process, collect it using a bucket. |
| 5 | Next step will be to get an elbow setting done on the pipe. You have to set up this fitting if you want to feed the filter, and also you could build a bypass valve to feed through the filter whenever you wish to do this. |
| 6 | Take the measurement of the pipe which leads to the bypass valve from the main pipe. So you need to cut the pipes accordingly and do the needful soldering before you connect both the pipe and the bypass valve. |
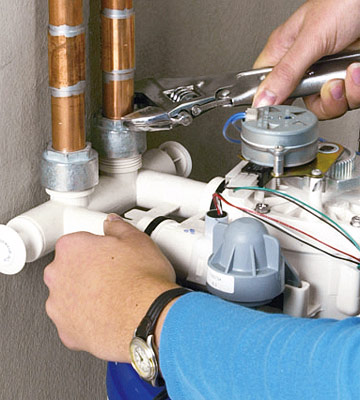
| 7 | Now you have to connect the hose to the water softener, by making use of the compression fittings. And this mostly comes with the unit itself. |
| 8 | Next, you have to clamp the hose with the unit. Then place it till the place where you wish to drain the water softener system. This can be a utility sink, floor drain or any pump kind of structure. The end part of the hose must be placed in such a way that it leaves a gap of 2 inches from the drain hole. Here you need to make sure that the tube is tightly clamped. |
| 9 | There is an overflow tube in this, and you need to connect this hose with the brine container. |
| 10 | Place the valve in the bypass arrangement, and let the water flush through it. This will help in removing any sand or sediment present in the pipe. |
| 11 | And finally, plug the unit, and then set backwash position on the valve found in this. |
So, these are the steps that need to be followed for setting up the water softener system at home. And, for whole-house unit installation, it is recommended to hire some expert for this.
Also, check: On the Go Water Softener Reviews 2018 | Comparing the Best For You
Water Softener Troubleshooting
Is your water softener not working properly? If you find any decrease in the performance of the system, then there is the need of some fixes. Now if you have got the old unit, and none of the tips explained here works for you, then you need to make a replacement of the water softener.
We will list out the three steps that need to be followed for performing troubleshooting. They are as follows:
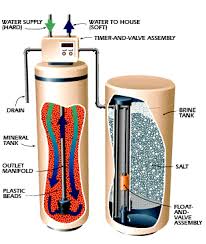
Check for any issue with the salt- Here you have to test the condition of the salt in the brine solution. You can make use of a broom, and break the salt domes if formed within the tank. Do check out the exact working process of water softener.
When you add salt to this solution, the salt won’t dissolve well here, and thus the softening process will be affected by this. So clean the brine tank, to get the water softener system running back correctly.
Wash the Resin bed properly- Clean the resin bed twice a year, and for this you have to make use of a resin bed cleaner. This is a kind of solution which has to be poured into the resin bed, and then the tank is washed with warm water.
Clean the Venturi Assembly- This is the region through which the brine solution passes through the brine tank to the resin tank. If you find the screen, and the nozzle is clogged with sediments, then hard water will never be softened properly in this system.
Other user guides: How Does a Water Softener Work? – Everything Included
So these are the steps through which you can try troubleshooting your water softener unit at home. If you have got the water softener system running back to normal, then share the tips among your friend circle. And if the issue persists, then let us know by mentioning the problem in the comment section below.
We believe that you are now clear with the steps on How to Install a Water Softener. So all set to rock with the newly installed softener? For regular updates on other water solution systems, follow us on WaterGadget.com.
RichardMartinez says
This really is one of the better instructional blog. You are very good at describing how to install a water softener.
Thanks. It helped a lot…
Brenda E. says
Its like you read my mind! You seem to know a lot about this, like you wrote the book in it or something.
I think that you could do with some pics to drive the message home a little bit, but instead of that, this is fantastic article. An excellent to read.